 Pin this
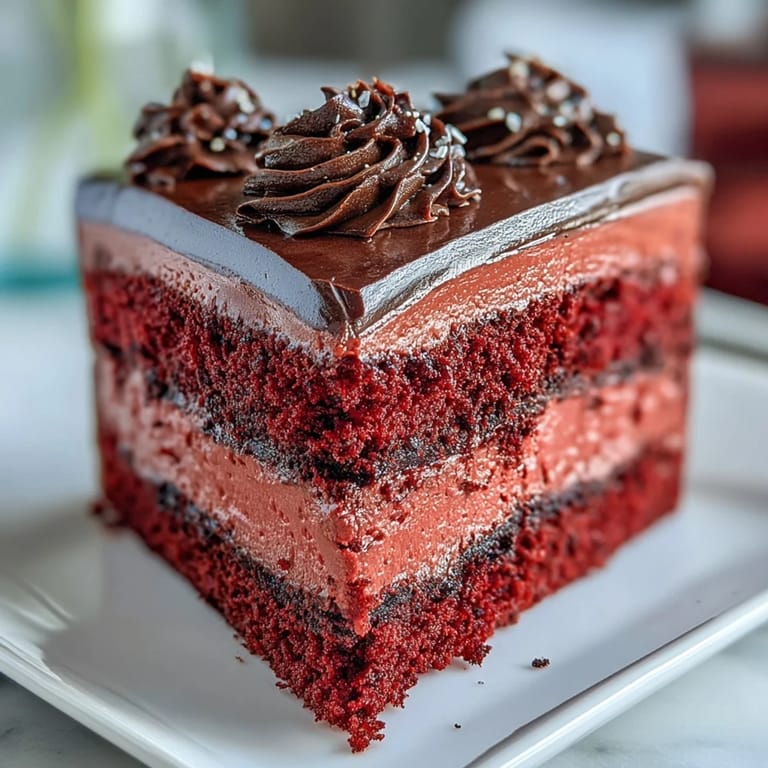
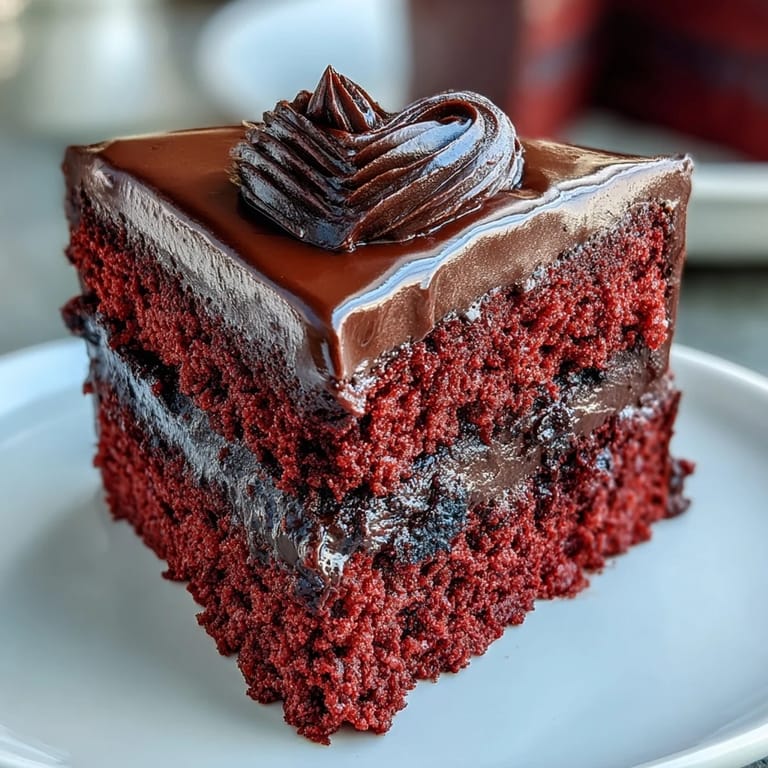
 The first time I attempted a red velvet cake for my niece's birthday, I ended up with pink cupcakes because I was too afraid to add enough food coloring. Since that slightly embarrassing moment, I've learned that red velvet demands commitment—both in color and in the patience it requires to get those velvet soft crumbs just right. This Betty Boop version became my redemption story years later when I finally embraced going all in on the dramatic.
Last Valentine's Day, my kitchen looked like a crime scene with red batter splatters everywhere, but watching my friends' faces when I revealed that glossy black Betty Boop heart against the crimson cake made every single stain worth it. My friend Sarah made me promise to teach her the chocolate transfer technique, though she still claims she'll never attempt red velvet again after seeing my walls.
Ingredients
- Cake flour: The lower protein content creates that tender velvet texture regular flour just cant achieve
- Natural cocoa powder: Just enough to hint at chocolate without overwhelming the classic red velvet flavor
- Room temperature butter and eggs: Cold ingredients create a stubborn batter that wont properly emulsify
- Red gel food coloring: Liquid versions thin your batter and never achieve that deep ruby-red we want
- Buttermilk: The acidity activates the baking soda and creates those signature velvet tender crumbs
- White vinegar: Reacts with cocoa powder to enhance that natural reddish hue
- Cream cheese frosting: Must be fully softened or you'll end up with lumpy speckled frosting
- Dark chocolate: Creates a dramatic silhouette that snaps cleanly when set
Tired of Takeout? 🥡
Get 10 meals you can make faster than delivery arrives. Seriously.
One email. No spam. Unsubscribe anytime.
Instructions
- Preheat and prep your pans:
- Heat oven to 350°F and generously grease two heart-shaped pans with butter, then line bottoms with parchment paper for easy release.
- Whisk the dry ingredients:
- In a medium bowl, combine sifted cake flour, cocoa powder, baking powder, baking soda, and sea salt until thoroughly blended.
- Cream butter and sugar:
- Beat butter for 1 minute until creamy, then gradually add sugar and continue beating for 2-3 minutes until the mixture turns pale and fluffy.
- Add eggs:
- Add eggs one at a time, beating briefly after each addition just until blended, and scrape down the bowl to ensure everything incorporates evenly.
- Color and flavor the batter:
- Mix in red gel food coloring, vanilla extract, and white vinegar until the batter shows that uniform deep red color throughout.
- Combine wet and dry:
- Alternate adding one-third of dry ingredients with half the buttermilk, mixing on low just until incorporated, and finish with remaining dry ingredients.
- Activate with vinegar:
- Stir distilled white vinegar into baking soda until it foams, then gently fold into the batter for that light, airy crumb structure.
- Bake the layers:
- Divide batter evenly between prepared pans, smooth tops, and bake for 25-30 minutes until a toothpick comes out clean from the center.
- Cool completely:
- Let cakes rest in pans for 10 minutes, run a knife around edges, then invert onto wire racks and cool entirely before frosting.
- Make the frosting:
- Beat softened cream cheese and butter for 2 minutes until smooth, then gradually add powdered sugar, vanilla, and salt until fluffy and spreadable.
- Assemble and crumb coat:
- Level cake domes if needed, stack layers with frosting between, apply a thin crumb coat over the entire cake, and chill for 10 minutes.
- Final frosting layer:
- Add a generous final layer of frosting, using smooth strokes or creating swirls with your offset spatula for texture.
- Create the silhouette:
- Place your Betty Boop stencil under parchment paper, trace with melted dark chocolate, and let set completely at room temperature or chill for 10 minutes.
- Apply the decoration:
- Carefully peel the chocolate silhouette from parchment and position it on the cake center, pressing gently to adhere to the frosting.
- Final touches:
- Decorate edges with frosting rosettes or edible glitter if desired, then chill the whole cake for 30 minutes before serving with a warm knife.
 Pin this
 My sister-in-law still talks about the year I made this for our family Valentine's dinner, mostly because I made everyone wait an extra twenty minutes while I painstakingly repaired Betty Boop's hairline that cracked during transfer. There's something incredibly satisfying about serving a cake that looks like it came from a fancy bakery window.
Getting That Perfect Red
Gel food coloring is absolutely non-negotiable here—liquid coloring not only dilutes your batter but also never achieves that saturated crimson that makes red velvet so striking. I've found that adding the gel with the liquid ingredients rather than the dry helps it distribute more evenly without requiring excessive mixing.
Making Chocolate Transfers
Let your chocolate set completely at room temperature if possible, because rushing it in the refrigerator can cause condensation that makes the chocolate stick stubbornly to parchment paper. Work quickly when positioning the silhouette on the frosted cake, since the warmth from your hands can start softening the chocolate edges.
Storage and Serving Tips
This cake actually improves after chilling overnight as the flavors meld and the frosting firms into that perfect cream cheese consistency. Slice with a knife dipped in hot water and wiped dry between cuts for those pristine clean edges that show off the red crumb beautifully.
- Bring slices to room temperature for 15 minutes before serving for the softest texture
- Any leftover frosting can be frozen for up to three months for future cakes
- The chocolate silhouette will stay crisp for about two days before gradually softening
 Pin this
 Theres nothing quite like cutting into that first slice and seeing the dramatic contrast between dark chocolate and deep red crumb. Hope this recipe brings you as many joyfully messy kitchen memories as it has brought me.
Recipe FAQs
- → Can I use regular all-purpose flour instead of cake flour?
Yes, you can substitute all-purpose flour by removing 2 tablespoons per cup and replacing with cornstarch, then sifting multiple times for a lighter texture similar to cake flour.
- → How do I prevent the chocolate silhouette from breaking?
Ensure the chocolate is fully set before peeling from parchment. Work in a cool room and handle gently. You can also make the silhouette slightly thicker for added stability.
- → What if I don't have heart-shaped cake pans?
Use two 9-inch round pans and carve the cooled cakes into heart shapes using a template, or simply keep them round and adjust the decoration placement accordingly.
- → Can I make this cake ahead of time?
Absolutely. Bake the cake layers up to 2 days ahead, wrap tightly, and refrigerate. Frost the day of serving. The finished cake stores well covered in the refrigerator for up to 4 days.
- → Why is vinegar added to the batter?
Vinegar reacts with baking soda to create air bubbles that lighten the crumb and enhance the cake's signature tender texture. It also helps activate the red color from the cocoa and food coloring.
- → Can I use natural food coloring instead of gel?
Gel coloring is recommended for vibrant hues without adding excess liquid. Natural alternatives like beet powder can be used but may produce a more muted color and slightly alter flavor.