 Pin this
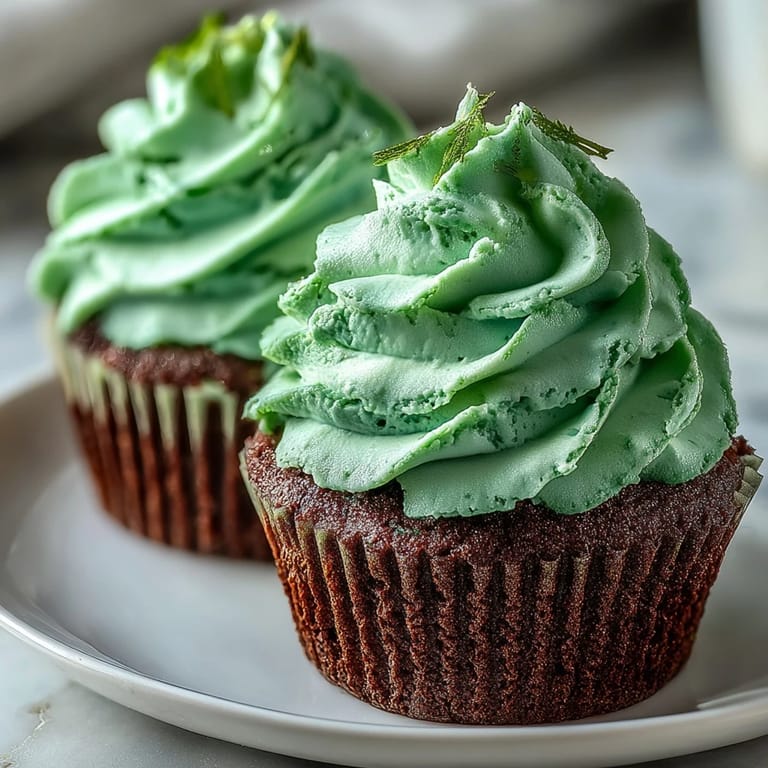
 My neighbor knocked on the door that March afternoon with a mischievous grin, holding up a bag of green gel food coloring she'd grabbed by mistake. Instead of tossing it, we decided right then to bake something festive, and these green velvet cupcakes became our happy accident. There's something magical about turning a simple chocolate cake into something that looks like it belongs in a St. Patrick's Day celebration, especially when it all started from her kitchen mishap. The combination of cocoa's richness with that unexpected green hue creates a cupcake that feels both indulgent and playfully celebratory. Now whenever March rolls around, I find myself hunting down that same gel coloring.
I brought a batch to my daughter's school potluck, and watching the kids' faces light up when they realized the green cupcakes weren't mint-flavored but actually chocolatey was priceless. One little boy insisted they must be magic because green things aren't usually chocolate, and suddenly I understood why this recipe had stuck with me so firmly. It wasn't just about the festive colors or the easy technique, but how a simple dessert could spark genuine joy and curiosity. That moment solidified these cupcakes as my go-to St. Patrick's Day offering.
Ingredients
- All-purpose flour (1 1/4 cups): This is your cake structure, and measuring by weight keeps them consistently tender every time.
- Granulated sugar (3/4 cup): Don't skimp here, as it gives these cupcakes their signature moist crumb.
- Unsweetened cocoa powder (1/4 cup): The secret player that makes them taste like chocolate even when they look like shamrocks, so use good quality stuff.
- Baking soda (1/2 teaspoon): This reacts with the vinegar and buttermilk to create that tender crumb, so measure carefully.
- Salt (1/4 teaspoon): A tiny pinch that amplifies the cocoa flavor and balances the sweetness.
- Buttermilk (2/3 cup, room temperature): Room temp buttermilk blends more smoothly and creates a more tender cake than cold.
- Vegetable oil (1/2 cup): Oil keeps these moister than butter would, and the neutral flavor lets the cocoa and cream cheese shine.
- Eggs (2 large, room temperature): Room temp eggs emulsify better, creating a smoother batter that bakes more evenly.
- Vanilla extract (1 teaspoon): A small amount that whispers in the background without competing with the cocoa.
- Distilled white vinegar (1 teaspoon): This sounds odd, but it's the magic ingredient that makes the green color pop and adds tanginess.
- Green gel food coloring (1 tablespoon): Gel coloring is crucial because liquid coloring would water down your batter and turn them gummy.
- Cream cheese (8 oz, softened): Make sure it's truly softened or your frosting will be lumpy and regrettable.
- Unsalted butter (1/4 cup, softened): Softened butter whips into the cream cheese to create that fluffy, cloud-like frosting texture.
- Powdered sugar (2 cups, sifted): Sifting removes lumps and makes the frosting silky smooth, not grainy.
- Vanilla extract (1 teaspoon for frosting): This rounds out the tanginess of the cream cheese beautifully.
- Green sprinkles or shamrock candies (optional): The finishing touch that celebrates the occasion without trying too hard.
Tired of Takeout? 🥡
Get 10 meals you can make faster than delivery arrives. Seriously.
One email. No spam. Unsubscribe anytime.
Instructions
- Get Your Oven Ready:
- Preheat to 350°F and line your muffin tin with cupcake liners, making sure they sit flat and secure. This temperature hits that sweet spot between cooking the inside through and keeping the tops tender.
- Combine the Dry Elements:
- In a large bowl, whisk together flour, sugar, cocoa powder, baking soda, and salt until everything is evenly distributed and no cocoa streaks remain. This pre-mixing ensures even leavening and texture throughout.
- Mix the Wet Ingredients:
- In a separate bowl, whisk buttermilk, oil, eggs, vanilla, vinegar, and that beautiful green food coloring until completely combined and the color is uniform. The vinegar will react with the baking soda, so don't wait too long before moving to the next step.
- Bring It Together Gently:
- Pour the wet mixture into the dry ingredients and stir with a spatula just until combined—lumps are your friends here, overmixing creates tough, dense cupcakes that nobody wants. You're looking for a thick, uniform batter with maybe a few streaks remaining.
- Fill the Liners:
- Divide batter evenly among the lined cups, filling each about two-thirds full so they bake up with level tops and no overflow. An ice cream scoop helps here and keeps portions consistent.
- Bake Until Done:
- Slide into the oven for 16 to 18 minutes until a toothpick inserted near the center comes out clean or with just a few moist crumbs clinging to it. At 18 minutes they should look set and spring back slightly when you gently press the top.
- Cool with Patience:
- Let them sit in the tin for 5 minutes to set slightly, then transfer to a wire rack to cool completely before frosting. Frosting warm cupcakes makes the frosting melt and slide everywhere, so this waiting step is non-negotiable.
- Make the Frosting:
- Beat softened cream cheese and butter together until the mixture is smooth and fluffy, about 2 minutes of steady beating. Gradually add sifted powdered sugar while beating, then add vanilla and whip until light and creamy, stopping occasionally to scrape the bowl.
- Frost Generously:
- Once cupcakes are completely cool, spread or pipe frosting onto each one with abandon, using a spatula for a rustic look or a piping bag for something more polished. A generous swirl shows you're celebrating.
- Add the Finishing Touch:
- Top with green sprinkles or shamrock candies if you're feeling festive, or leave them naked for an elegant look. Either way, you've earned a moment to admire your work.
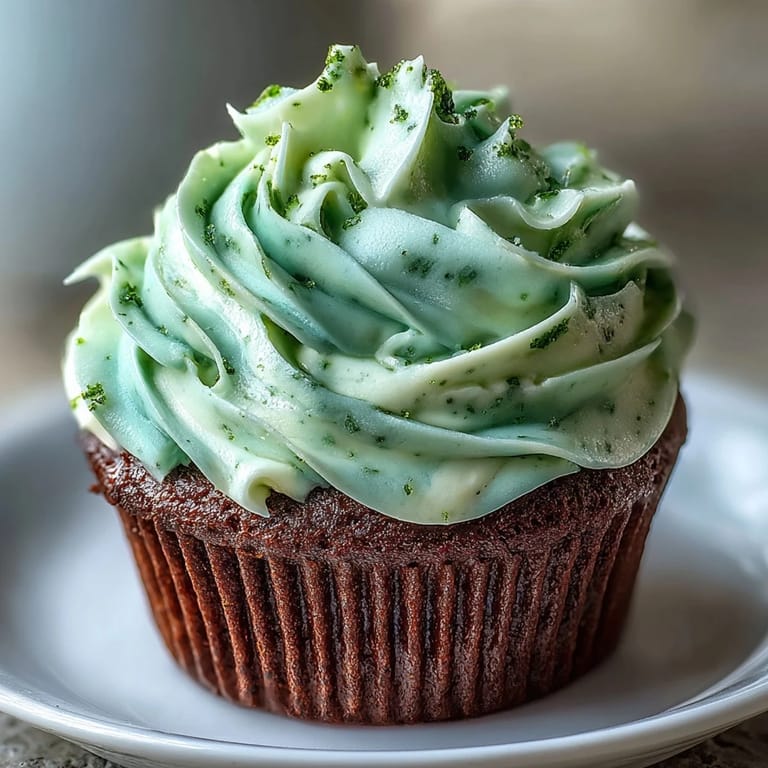
 Pin this
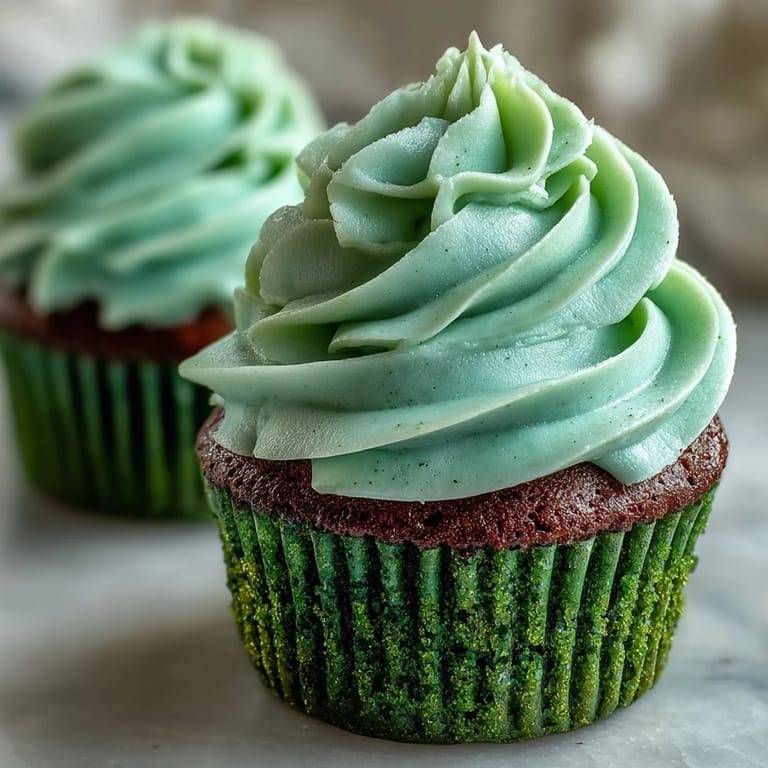
 There's a moment while frosting these when you realize something simple can become something memorable just by paying attention and adding a little thoughtfulness. My eight-year-old asked why I wasn't making them pink or blue, and I explained that sometimes the best celebrations are the ones that honor tradition, even if we make them our own way. That conversation, frosting spatula in hand, felt like the real point.
Why Cocoa and Green Work So Well Together
When you think about it, green velvet is the Irish cousin of red velvet, and the chemistry is actually beautiful. The cocoa gives you a sophisticated depth that keeps these from feeling like a novelty dessert, while the bright green catches everyone's eye. It's not chocolate overload, it's a whisper of cocoa wrapped in celebration. I've learned that the best themed desserts are the ones that don't sacrifice actual flavor for aesthetics, and this recipe nails that balance.
The Cream Cheese Frosting Difference
Regular buttercream would be too sweet and one-dimensional on top of these cupcakes, but cream cheese frosting brings a slight tanginess that makes you want another bite. The butter lightens it so it's not as heavy as pure cream cheese, and the vanilla just frames everything perfectly without demanding attention. I once made these with regular powdered sugar frosting for a batch I was rushing through, and they tasted fine but felt incomplete. Once I went back to cream cheese, I understood why this pairing keeps winning.
Serving and Storage Wisdom
These cupcakes taste best at room temperature, when the cocoa flavor opens up and the frosting has that perfect soft texture that's not too firm or melty. Store them in an airtight container at room temperature for a day or two, or refrigerate them for up to four days if you're planning ahead. They also freeze beautifully unfrosted, which means you can bake them weeks in advance and frost them the day of your celebration.
- If you're transporting them to a party, frost and decorate them just before leaving so the frosting stays pristine and beautiful.
- A piping bag with a big round tip makes frosting easier and faster than you'd think, and cleanup is honestly worth it for the polished look.
- Keep any leftovers covered loosely so the frosting doesn't get a skin on top while still protecting the cupcakes from drying out.
 Pin this
 These green velvet cupcakes have become my favorite way to celebrate St. Patrick's Day because they prove that a little thoughtfulness and good technique can turn a simple idea into something people genuinely look forward to. Make them, share them, and watch how something as small as a cupcake can bring people together.