 Pin this
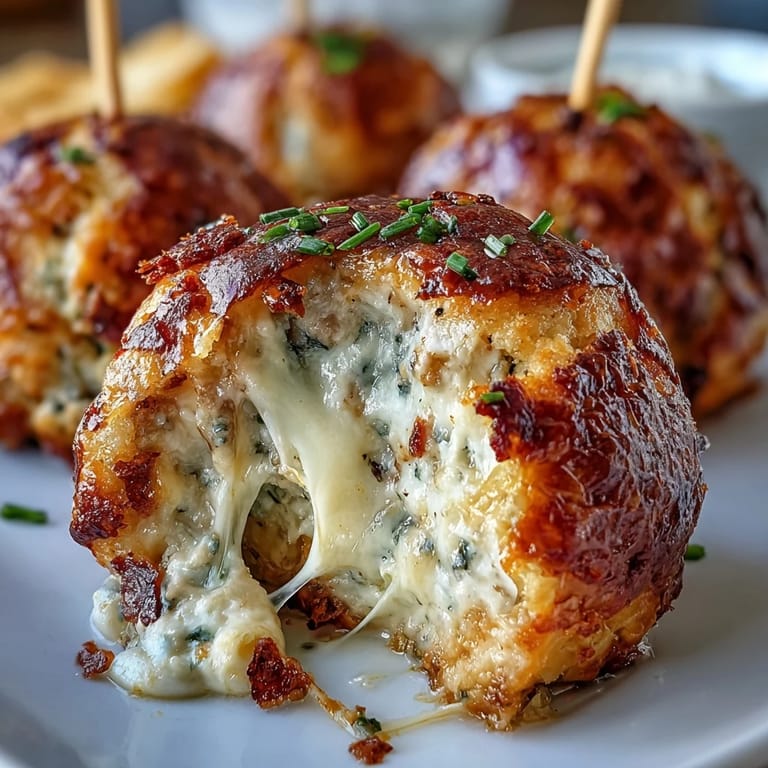
 There was a particular Saturday afternoon when the house buzzed with excitement for the Derby, and instead of the usual chips and dip routine, I decided to try something new—these olive cheese balls on skewers. As cheddar melted into the dough and the aroma of smoked paprika curled around the kitchen, I found myself sneaking olives and crumbly bits of cheese while prepping. The sizzle and pop from the oven signaled golden bites in the making, each one promising a perfect meld of sharp, briny, and buttery. There’s something about threading each warm ball onto a skewer that feels instantly festive and playfully inviting. These little bites have earned an almost legendary status among my friends, often requested even when there’s no party in sight.
Last May, as family hat brims bobbed past the television and bourbon lemonade glasses clinked, I passed a platter of cheese balls on skewers through the crowd. My cousin, never shy with her opinions, took a bite and declared them 'the showstopper, even before the horses.' I grinned, thinking of the flour dust on my shirt and the way my daughter’s hands helped thread the skewers. Good snacks have a way of making the biggest days feel even brighter. Even my uncle, the firmest of snack purists, went for seconds.
Ingredients
- All-purpose flour: Gives the dough its structure and helps everything bind—measure carefully, as too much will make the dough tough.
- Sharp cheddar cheese, shredded: Use good-quality, hand-shredded cheddar for meltier, bolder flavor.
- Unsalted butter, softened: Soft butter blends easily and makes the dough tender—don't use cold butter here.
- Cayenne pepper (optional): Adds a subtle kick that sneaks up on you—taste as you go if you're spice-sensitive.
- Smoked paprika: Lends a savory depth and a pop of color to the dough—it’s my not-so-secret secret ingredient.
- Salt: Just enough to keep flavors lively, especially with salty olives.
- Large green olives, pitted: Choose firm, briny olives—the bite is everything, and too soft a filling doesn’t hold up.
- Appetizer-sized skewers or toothpicks: They’re for party fun and mess-free eating, but they also make the platter look extra polished.
Tired of Takeout? 🥡
Get 10 meals you can make faster than delivery arrives. Seriously.
One email. No spam. Unsubscribe anytime.
Instructions
- Prep and Preheat:
- Fire up your oven to 400°F (200°C) and line a baking sheet with parchment so nothing sticks or burns.
- Mix the Dough:
- In a bowl, toss together flour, cheddar, butter, cayenne, paprika, and salt—then use your hands; the warmth helps everything meld into a soft, even dough.
- Divide Evenly:
- Pat the dough into a chunky rectangle, then slice into 24 bite-sized pieces—aim for about a tablespoon each, but a little wonkiness is part of the charm.
- Wrap the Olives:
- Flatten each dough piece in your palm, tuck an olive in the center, and pinch the dough up and around—roll gently to seal, making sure there are no cracks.
- Arrange & Chill (Optional):
- Space the balls out on your lined tray; if time allows, pop them in the fridge for 10 minutes so they bake up neater.
- Bake to Perfection:
- Slide the sheet into the oven and let the house fill with the scent of cheese and paprika for 16 to 18 minutes—the balls should look golden and feel firm when gently pressed.
- Thread & Serve:
- After a short 5-minute rest, gently skewer each cheese ball—serve right away, when they’re warm and melty, or at room temp if you need more time.
 Pin this
 The night these made an appearance at my book club, everyone paused mid-sentence to savor them—suddenly, the conversation was all about recipes and favorite cheeses, not just the novel. Sometimes, food is the star that brings a room full of personalities together. That evening, my friend Tia messaged for the recipe before she’d even left my driveway. The little things, like these skewered cheese balls, have a way of sticking in your memory. Maybe it was the warmth, or maybe it was just the cheese.
What Makes These So Party-Perfect
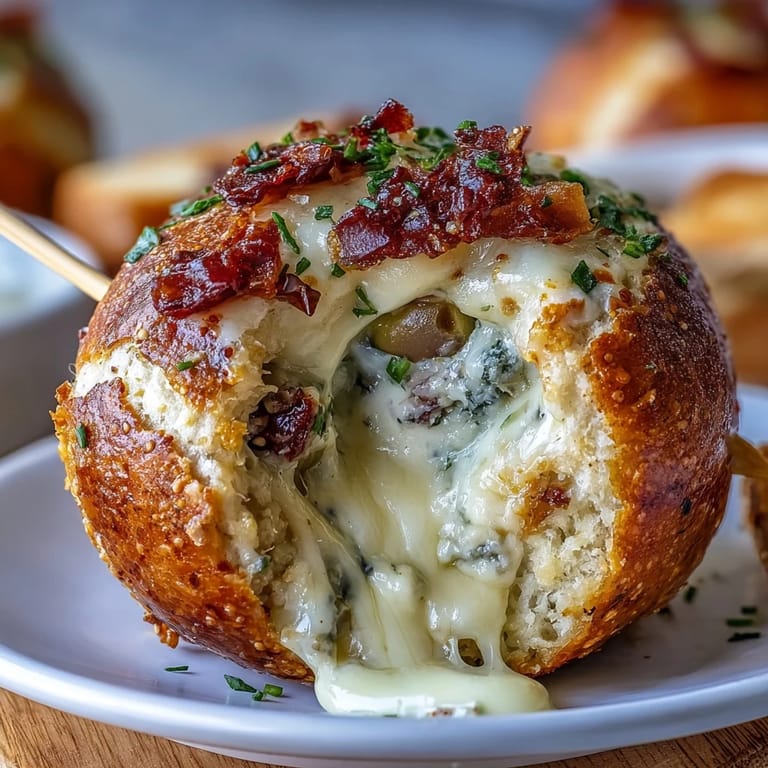
I’ve learned that anything served on a stick is automatically more fun and feels fancier, even if it started as olive and cheese from the fridge. Guests love them because they’re portable, shareable, and you never have to pause the festivities to find a napkin. The crispy outside gives way to tangy melted cheese and a briny olive center—it’s a bite-sized surprise every time. Plus, they pair with almost any kind of cocktail you can dream up.
Swaps and Variations You’ll Want to Try
Once, out of green olives, I reached for jalapeño-stuffed ones and didn’t regret it for a second—the little kick was a game changer. Black olives work too if you want something milder, and I’ve even tried sundried tomatoes in the center when catering to olive-averse friends. Play around with different cheeses, like smoked gouda or even pepper jack, and don’t be afraid to mix in a pinch of garlic powder or a few chopped chives for extra dimension. If you're feeling adventurous, serve them with a bourbon honey dip or some sharp mustard on the side.
Make-Ahead, Leftover, and Serving Secrets
These freeze beautifully unbaked—make a double batch, freeze individually on a tray, then bag them up so you can bake on demand for surprise guests. Leftovers, which rarely happen, are easily revived with a brief oven reheat. I always keep a stash of skewers in the drawer because somehow the balls just aren’t as magical without them.
- Brush with a little melted butter for an extra golden finish before baking.
- Serve on a bed of arugula or herbs for an extra pop of color.
- Don’t skip the resting period or you’ll lose that perfect molten center.
 Pin this
 I hope these Derby-inspired olive cheese balls brighten your gathering as much as they have mine. Don’t be surprised if they disappear before you’ve had a chance to take a second skewer.
Recipe FAQs
- → How do I keep olives from leaking oil while baking?
Pat olives dry before enclosing and use pitted, well-drained varieties. Wrapping the dough tightly and chilling the balls for 10 minutes before baking helps seal them and reduce oil seepage.
- → Can I prepare these ahead of time?
Yes. Form the filled balls and refrigerate on a tray, covered, for up to 24 hours. For longer storage, freeze on a tray then transfer to an airtight container. Bake from chilled or frozen, adding a few extra minutes if frozen.
- → What are good substitutions for the filling or spices?
Swap green olives for black olives or jalapeño-stuffed olives for heat. Add a pinch of cayenne or smoked paprika to the dough for depth, or fold in finely chopped herbs like chives for freshness.
- → How can I get a crisper exterior?
Brush balls lightly with melted butter before baking or bake on a preheated baking sheet. A short chill before baking firms the dough and promotes a more even, crisp finish.
- → Are there gluten-free options for the dough?
Use a 1:1 gluten-free flour blend that contains xanthan gum for structure; you may need to adjust hydration slightly. Press and shape gently, as gluten-free doughs can be more delicate.
- → How should leftovers be stored and reheated?
Keep leftovers in an airtight container in the refrigerator for up to 3 days. Reheat in a 350°F oven until warmed through to restore crisp edges; avoid microwaving if you want to keep texture.